Watering in Early Summer and Late Spring in Zone 10b Guide

early summer watering guide for heat

Hey Southwest Florida gardeners. As we move from late spring into early summer, temperatures climb into the 90s while rain can still be spotty. April through early June often brings dry spells between thunderstorms. This is when many new plantings of okra, Seminole pumpkin, southern peas, winged beans, and tropical greens need careful attention. Water wrong and you lose transplants or watch fruit set drop.

Here is exactly how I water during this hot, dry transition period so my garden stays productive without wasting water or inviting disease.

Understand Our Soil and Weather Reality

Southwest Florida sugar-sand drains extremely fast and holds almost no moisture. In 90-degree heat with low rainfall, the top few inches can dry out in a single day. At the same time, once the summer rains arrive heavy, overwatering becomes the bigger risk.  If you are a container grower like I am, you also need to be concerned with the temperatures of your soil in the container.  For instance, growing containers on hot asphalt will kill roots and plants.

The goal right now is deep, infrequent watering that encourages strong roots while the soil surface stays slightly dry to reduce fungal problems.

How Much and How Often to Water

  • Established plants (2 to 3 weeks after transplant or direct-sow): Water deeply 2 to 3 times per week. Give each plant enough so the root zone (first 8 to 12 inches) gets moist but not soggy.
  • New seedlings and transplants: Water lightly every day for the first 7 to 10 days, then shift to deeper watering every other day.

Rule of thumb in 90-degree weather with little rain:

  • Raised beds and containers: 1 to 1.5 inches of water per week total, split into 2 or 3 sessions.
  • In-ground beds (if amended well): Slightly less frequent because they hold a bit more moisture.

Stick your finger 4 to 6 inches into the soil. If it feels dry at that depth, it is time to water. Do not water on a strict daily schedule. Let the plants and soil tell you.

Best Watering Practices for Southwest Florida

  • Water in the early morning. This gives leaves time to dry before night and reduces disease. Avoid evening watering.
  • Water at the base. Keep foliage dry. Use soaker hoses, drip irrigation, or a watering can aimed at the soil.
  • Mulch is your best friend. Keep 3 to 4 inches of mulch on all beds. It cools the soil, slows evaporation, and can cut watering needs by 30 to 50 percent.
  • Deep and slow. Water slowly so it sinks in instead of running off. In sandy soil this may take 20 to 40 minutes per bed.
  • Containers and raised beds dry fastest. Check them first. They often need more frequent attention than in-ground plantings.

Signs You Are Getting It Right or Wrong

  • Underwatering: Wilting in the afternoon, slow growth, small fruit, leaf drop.
  • Overwatering: Yellow lower leaves, soft stems, fungal spots, root rot smell.
  • Just right: Steady growth, deep green leaves, good fruit set, soil moist a few inches down but surface dry.

Pro Tips for This Hot Transition Period

  • Build up organic matter with compost. The more humus in your sand, the better it holds water.
  • Group plants with similar water needs together. Okra and roselle are fairly drought tolerant once established. Seminole pumpkin and winged beans like steady moisture while setting fruit.
  • Use shade cloth (30 to 50 percent) during the hottest part of the day to reduce water stress.
  • Install a simple rain gauge or check forecasts. When real rain finally arrives, skip watering that day.
  • Consider drip irrigation with a timer for consistency. It pays for itself quickly in our climate.

Early summer watering is all about balance. Give your heat-loving crops what they need now while training their roots to go deeper. Once the heavy rainy season kicks in, you will simply ease back and focus more on drainage and airflow

Happy planting and stay consistent in the garden.

Brite Leaf Citrus Nursery 2 Month Update

Real Growth After 60+ Days in the Ground

I planted my Brite Leaf Citrus Nursery trees on March 5 (feel free to read my original unboxing review). Today is May 12, so we are sitting at just over two months in the ground. I finally pulled out the unboxing photos from the day they arrived and snapped fresh shots this morning. The side-by-side comparison shows exactly how far these trees have come.

jobes organic fruit citrus fertilizer
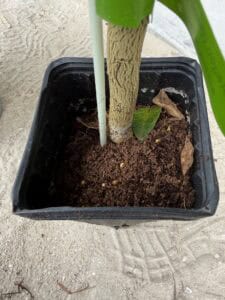
Right around the ten-day mark after planting I noticed some light discoloration on the leaves. Nothing dramatic, but enough to make me pay attention. I am growing in a bark nugget and peat moss mix, so magnesium deficiency seemed like the obvious suspect. Two weeks after transplant I worked in Jobe’s Organics Granular Garden Fertilizer, and the problem started clearing up within a few weeks. From there the growth really exploded. New flush pushed out strong on every tree and the foliage returned to that deep, healthy green I saw when the trees first showed up from Brite Leaf.

captain jack spinosadI also spotted a few pests making themselves at home. There were some fine lines and marks under the leaves plus a little curling on the newest growth. It hasn’t got out of hand, but I wanted to stay ahead of it. I mixed up Bonide Captain Jacks Deadbug Brew concentrate in a spray bottle and misted the trees every three nights for a short run. You can grab the ready-to-use spray version if you prefer not to mix, but the concentrate lasts longer for multiple applications. Within a couple of weeks the signs disappeared and the trees kept pushing new leaves.

Updated Pros and Cons After Two Months

Here are the before-and-after photos so you can see the growth for yourself. The unboxing shots show the healthy arrival straight from Brite Leaf Citrus Nursery. The current pictures from today show how much vertical height and leaf density they have added in sixty-eight days, especially once the Jobe’s fertilizer kicked in.

brite leaf lime tree 60 days of growth

The tall skinny citri-pots they ship in really do set these trees up for strong root systems once they hit the ground. Even with the minor nutrient dip and light pest pressure early on, everything bounced back fast. That tells me the stock Brite Leaf sends out is tough and well-grown from the start.

Pros

  • Strong new flush and visible size increase once fertilized
  • Healthy root establishment from their greenhouse method
  • Quick recovery from early nutrient issues with Jobe’s Organics
  • Easy to treat minor pest pressure organically

Cons

  • Early magnesium-type discoloration in my soil mix (fixed fast with fertilizer)
  • Light pest activity under leaves that needed a short treatment

What I Would Do Differently Next Time

Maybe test the soil mix for magnesium levels right at transplant and keep a better eye on pests, though I think I did a decent job overall. Small lessons that will make the next order from Brite Leaf even smoother.

I will keep these same trees on the same schedule and drop the full 90-day report in early June. That one will include exact height measurements, and the exact soil and fertilizer schedule that locked in the explosive growth phase.

Ready to start your own citrus trees? The original Brite Leaf Citrus Nursery review with full unboxing details is right here on the site, or head straight to their current lineup at briteleaf.com.

Products I Used in This Update

Jobe’s Organics Granular Garden Fertilizer, 4 lbs Bag – Cleared up the early magnesium deficiency fast and triggered the big growth flush I am seeing now.

Bonide Captain Jacks Deadbug Brew, 16 oz Concentrate – Handled the light pest activity under the leaves without any harsh chemicals.

My First Zone 10b Spring: 10 Heat-Loving Plants I’m Trying in March 2026 (Wish Me Luck!)

Hey folks—still super new to Zone 10b gardening here in early March 2026. The weather’s already feeling summery (mid-80s and climbing), soil’s warming up, and no frost in sight. I’m excited but keeping expectations realistic—you never know how things will handle the incoming heat and humidity until you try!

I hate okra (slimy texture is a no for me), and I’m not big on tomatoes or eggplant either (taste/texture issues), so I’ve swapped those out. Sticking close to reliable Zone 10b picks from UF/IFAS guides and local Florida gardener advice: warm-season crops that love our long, hot growing window and can establish now before the real scorch hits. I’m going with a mix of veggies, herbs, beans, and a couple flowers for pollinators and fun.

Setup’s the same: raised beds/containers, full sun, good mulch to keep roots cool, consistent watering, and watching for pests. Here’s what I’m actually planting this month—fingers crossed for some wins!

1. Peppers

Peppers are a must for me—they’re tough, productive, and I love the flavor kick. March is perfect timing; they settle in with the warm soil and keep going for months.

Mixing it up: jalapeños, bells for milder stuff, cayenne for heat, and maybe a habanero if I feel adventurous. Super forgiving for beginners.

2. Cucumbers

Fast and fresh—cucumbers grow quick in our warmth, and starting now gives them time to vine before peak summer stress.

Trellising to save space, full sun, rich soil. Expecting slices in 45–60 days. If powdery mildew shows up, lesson learned!

3. Zucchini

Zucchini seems like it’ll explode here (in a good way). March planting should mean heavy yields early before heat slows production.

A couple plants from seed—harvest around 50 days. Ready for zucchini bread, grilling, or giving away extras!

4. Basil

Basil thrives in our heat—it’s basically foolproof and smells incredible. Planting in pots and interplanted for pollinators.

Pinch regularly for bushiness; fresh pesto and salads all season (hopefully). Great easy win for a first-timer.

5. Sweet Potatoes

These are heat champs and low-maintenance once going. Slips go in now for a fall harvest, but the vines grow fast and leaves are even edible!

Full sun, loose soil. Excited to try homegrown sweets—plus, they handle our sandy dirt well.

6. Southern Peas (like Black-Eyed or Crowder)

Southern peas (cowpeas) love hot weather and poor soil—perfect for Zone 10b summers. They’re nitrogen-fixers too, so good for the garden.

Bush or vining types; productive and drought-tolerant once established. Great side dish staple.

7. Yardlong Beans

These long-podded beans handle our humidity and heat way better than regular green beans. Super productive climbers.

Trellis them up—pods up to 2 feet! Fun and space-efficient for summer.

8. Sunflowers

Adding some non-edible joy: sunflowers for bees, beauty, and easy success.

Quick from seed, bloom in 70–90 days. They’ll help pollinate the veggies and make the garden look cheerful.

9. Zinnias

Zinnias for nonstop color and butterflies—dead easy in heat.

From seed now, blooms through summer/fall. Cut-flower bonus and pollinator magnets.

10. Malabar Spinach (or another tropical green)

Swapping in a heat-loving leafy: Malabar spinach (not true spinach, but climbs and thrives in our tropical vibe). It’s a great summer green substitute.

Vining, heat/drought tolerant—pick young leaves for salads. If it works, it’ll be a game-changer for greens in summer.

Wrapping Up My Adjusted First Zone 10b March Planting

Ditching okra, tomatoes, and eggplant keeps things enjoyable for me—no point forcing stuff I won’t eat! These picks align with what UF/IFAS and South Florida gardeners recommend for March: beans, cucurbits (cukes/zukes), peppers, basil, sweet potatoes, southern peas, yardlongs, and heat-tolerant flowers/greens like zinnias and Malabar spinach. They should root strong in this milder spring weather before the full summer blast.

I’m keeping it beginner-simple: mulch heavily, water deeply but not too often, maybe some organic fertilizer. Here’s to a fun, productive first hot-climate garden season.

(Feel free to tweak based on your space or tastes—happy planting, and good luck to us rookies!)

Can You Grow Lime Trees in Containers in Hot Climates? My Research Before Planting

growing lime trees in containers in florida or hot climates

Why I Started Researching Lime Trees in Containers

Living in Southwest Florida, citrus seems like an obvious thing to grow. But after reading about the devastating pests and diseases that have damaged much of Florida’s citrus industry, I started to wonder if growing citrus successfully at home was even realistic.

Limes in particular — especially Key Limes — are a fruit I’ve always wanted to grow. They’re incredibly useful in the kitchen, and more importantly for me, they make some of the best margaritas I’ve ever had. Those little fruits pack a serious punch, and the idea of eventually having a few productive lime trees in my backyard was high on my list.

At the same time, I quickly realized my soil is extremely sandy. Planting trees directly in the ground felt like a big commitment, especially when I wasn’t fully sure how well citrus would perform in my yard.

So before putting anything permanently in the ground, I started researching whether lime trees could be grown successfully in containers instead.

Read more

Review of Brite Leaf Citrus Nursery

Brite Leaf Citrus Nursery Review: Healthy Citrus Trees Shipped Fast – My Honest Take After Unboxing

If you’re hunting for citrus trees that arrive looking like they just stepped out of a Florida greenhouse, Brite Leaf Citrus Nursery is worth a serious look. I ordered a handful of their trees for theseedclub.com testing, and they showed up exactly as advertised: gorgeously green, pest-free, and ready to thrive. No drama, no disease, just solid quality at a price that makes you want to order more.

Here’s the full breakdown so you can decide if Brite Leaf is the right online citrus nursery for your backyard orchard.

Why I Ordered from Brite Leaf Citrus Nursery

Brite Leaf has been growing containerized citrus since 1998 in Lake Panasoffkee, Florida. They started with commercial groves and now ship the same premium stock straight to home gardeners. Their trees are hand-budded on sturdy rootstock, grown in fully enclosed greenhouses, and bred for real-world performance—not just pretty photos.

I picked a mix of dwarf varieties because space matters when you’re squeezing fruit trees into a suburban yard. Shipping was straightforward, and the whole process felt low-risk thanks to their clear policies on cold weather and packaging.

Unboxing Day: What the Trees Actually Look Like

brite leaf shipping box
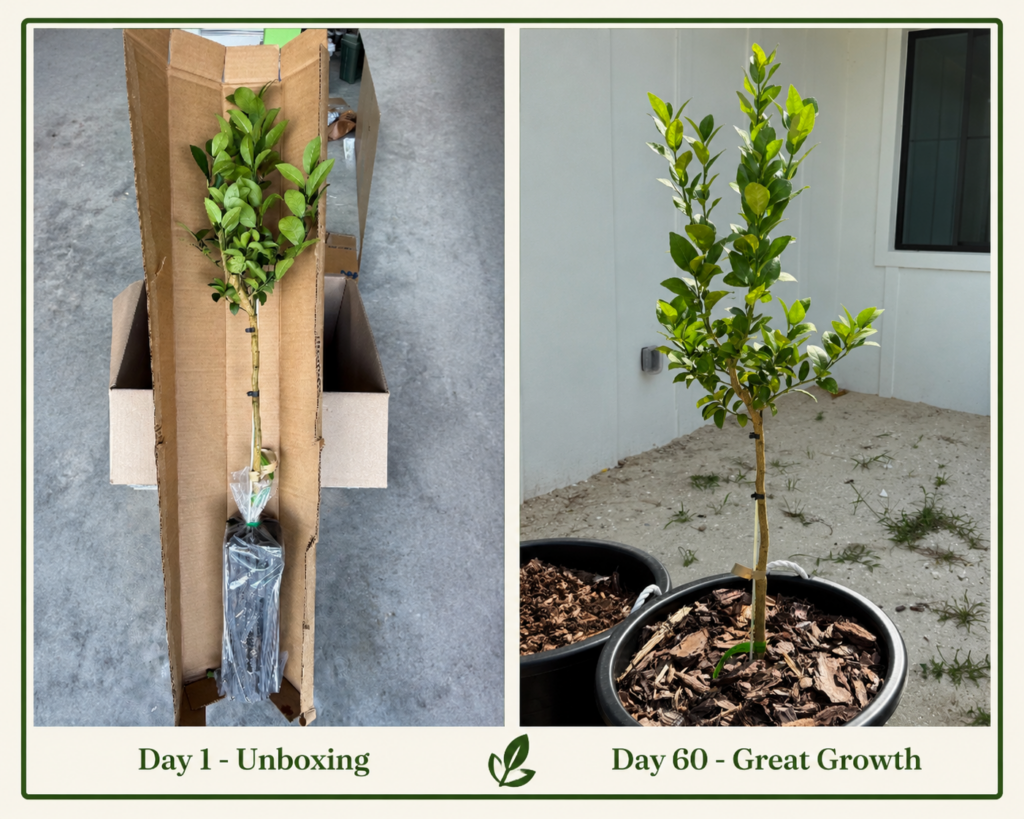
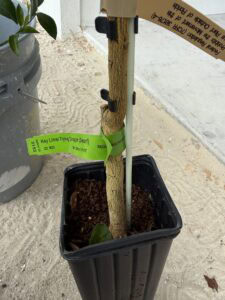
The box hit my garage perfectly packed. Each tree was wrapped snugly—no crushed leaves, no loose soil everywhere. They used a clever screw-through-the-pot trick to keep everything stable during UPS Ground transit (a detail they explain on their shipping page).

Pro tip for your own order: Open from the bottom and slide the tree out pot-first. Takes 30 seconds, and protects the tree.  (Note:  I sliced the side of the box for illustration to you all to see how it was packaged inside, not recommended.)

Here’s where the pictures tell the real story (see the unboxing pics below). The foliage was a deep, vibrant green with zero signs of stress. Every single plant had strong, healthy new growth and clean roots. No sticky residue, no webbing, no weird spots—nothing that screamed “shipped from across the country.”

The Container Situation – Long, Skinny, and Totally Intentional

brite leaf lime tree inside box
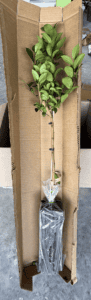
One thing jumped out immediately: the pots are tall and narrow (think 4″ square by about 14″ deep, roughly 1-gallon size). They call them citri-pots, and it’s how Brite Leaf grows everything in their greenhouse system for better root depth and air pruning.

Yes, they tip over easily on a table until you plant them. That was my only minor annoyance. But once I understood it’s intentional for stronger trees, it stopped bugging me. The trade-off? Healthier root systems that translate to faster establishment in your yard or big pot.

Plant Quality and Labeling

Labeled clearly with variety and rootstock info—super helpful when you’re juggling multiple trees. No disease, no pests, no weak branches. These were the healthiest mail-order citrus I’ve received, period. The team obviously knows what they’re doing; their commercial-grower roots show.

Value for the Price – Would I Buy Again?

Absolutely. For what you get—grafted, greenhouse-grown, disease-exclusion stock—the pricing beats a lot of big-name nurseries while delivering better quality than the big-box stores. Shipping costs were reasonable ($15–$50 depending on quantity), and the trees arrived in 1–3 days inside Florida, a little longer out-of-state.

I’ll be back for more varieties once my 60 day update is ready. Early signs point to strong new flush already.

Pros and Cons (Real Talk)

brite leaf flying dragon dwarf lime treebrite leaf healthy lime tree stem  

Pros

  • Gorgeous, vigorous plants right out of the box
  • Professional wrapping and fast, secure shipping
  • Clear labeling and healthy root systems
  • Excellent price-to-quality ratio
  • Family-owned with decades of citrus know-how

Cons

  • Tall, skinny pots tip easily until planted (minor)
  • No walk-in retail (con for some)…BUT they do this to keep their plants healthy from outside diseases, so 100% worth it.

60 Day Follow-Up Coming Soon

I’m keeping these trees under observation and will post a full photo update with growth measurements, new flush details, and any early fruit-set notes. If you’re on the fence, check the website soon for the 60 Day update—I’ll send the link the moment it drops.

Ready to Grow Your Own Citrus?

Head over to Brite Leaf Citrus Nursery and see their current dwarf citrus lineup. Tell them theseedclub.com sent you—they love hearing where orders come from.


How to Propagate Cordyline from Cuttings in Hot Climates (My Southwest Florida Experience)

why i tried propagating cordyline in southwest florida

Why I tried Propagating Cordyline in Southwest Florida

This past summer into winter 2025, my wife and I were renting a small home in Southwest Florida (Naples, to be specific). We had recently moved from Central Texas (Zone 9a) to Southwest Florida (Zone 10b) and were waiting for our new home to be completed in neighboring Bonita Springs.

I couldn’t do any landscaping at our new house under construction unless I wanted it destroyed by workers and heavy equipment. Knowing my desire to grow something wouldn’t be satisfied just sitting around, I decided to experiment with propagating some of the plants around our rental home — specifically Cordyline.

And hey… maybe it would save me a few bucks on landscaping later. (Answer below.)

Read more